The Famous Downward Hike
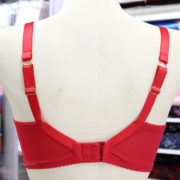
The downward hike band is one of the nicest touches you can add for your bra wearing comfort. It is easy and not too time consuming to do, and can be done on both the full and partial band bra patterns without any trouble. It’s become famous (in my opinion) because of my story relating to its discovery. But, I digress… The downward hike band is far more supportive than a regular band; that extra dip downward brings the bottom edge of the band down an inch or more, so if you or your client has a band that looks like it is riding up, this may be a good alteration to do.
The downward hike band is NOT for those who already have their bands sitting low on the back, otherwise the hook and eyes are set too low to do the job of supporting the band.
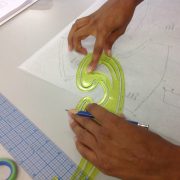
To start with, trace and cut out the back pattern piece. I have shown a partial band back here, but the method of alteration is the same on the full band as well. Draw a line from the strap attachment point straight down, parallel with the hook and eye as shown below. Use tape to secure the pattern piece to another piece of paper, avoiding tape in the area between the line and the hook and eye. Cut along this line from top to bottom, going TO but not THROUGH the bottom band. Also mark a line to the desired drop point. See below.
You will probably want to drop down an inch to an inch and a half (25 – 37 mm). There IS a limit to how much you can drop the back; I would say that 2” (50 mm) is the absolute limit, but this depends on the length of the back piece. For example, a 32 band cannot drop as low as a 42 band, there simply isn’t the length to achieve this drop. Pivot this cut-off piece so that the hook and eye rotates downward until it reaches the line as in the drawing below. Once you have pivoted the hook and eye extension, tape it down in this position.
All that is left to do is to join up the hook and eye curve to the top of the band. Unfortunately, the line that is the most obvious is NOT the line to follow. The mistake that many drafters make is to join the top of the hook and eye over to the top of the wire line. This results in the loss of much of the support that the band can give. It also makes the top length too long and this will result in gapping along the top edge. Avoid the draft shown at the top of the drawing below.


This post does not show any change to the DOGS, but I think in a Craftsy class you changed the DOGS to be perpendicular to the H&E line. Is changing the DOGS correct and how important is it?
I changed the DOGS grainline per the Craftsy class instructions and it did not work well. It caused a drag line across the band because now the grainline is on the bias and not stable. The original grainline works best for me.
I would like to see some real photos of a person wearing a bra with this kind of modification. Thanks you for sharing this hack!
I still don’t get it. I have the same problem as Alesia – it seems to me that with the band dipping down like that, the hook and eyes won’t close. Or if you closed them anyway, the lower edge of the band would be on your skin, but the upper edge of the band would hang away from your back. I mean, the upper band length has been made so much longer, whereas the lower band edge hasn’t. So where is my reasoning going wrong?
The upper band isn’t made any longer – the extra length is added to the strap scoop, but that is where it is needed. Draw the hinge line from the bottom to the top in the strap scoop…not the top edge.
Thanks Beverly – I had understood that. I guess what my brain can’t process is that Center back isn’t at 90 degrees anymore, like you said to Louise Morin. How come that doesn’t make a problem with closing the bra? I want to add the downward scoop to my second bra, on which I’ve done quite a number of fine-tuning, but I’m scared of wasting time and material. I’m a cheapskate, I guess. Why can’t I just cut the back band as you did, then slide it down along the cutting line instead of pivoting? That would seem more logical to me because Center back would stay at 90 degrees (well except for the tiny bit you have to add to offset the slight angle that is created to the lower edge when you redraw it). But then, I’m not the expert…
It is not important that the centre back be at 90 degrees but that the hook and eye have to sew on the bottom band at 90 degrees. The whole idea of the downward hike is to have to back curve downward, which means the strap scoop has to be longer.
Thank you very much for the clarification…
I just used this downward hike adjustment. It was just what I needed. I did find that the band was baggy under my armpit. I made a dart the same width as I had pivoted to my line. It turned out great.
Can I combine the downward hike with the Yback without the keyhole?
No, because the downward hike will put the centre back on an angle different than 90 degrees. You must have 90 degrees in order to have the back cut on the fold
Thank you Beverly for your very quick reply.
I had so much fun in Boob Camp in march 2018.
I made a swimtop and two bras since I had my class. I did the partial band, the front closing, the Y-Back, the foam cup, the foldover binding.
I enjoy your videos on Craftsy Unlimited.
Wow! You’ve been busy!
How do you apply the hooks and eyes after the downward hike draft? The ends look like the ends are more like / \ to each other rather than | | so the band would not lie flat.
The “box” for the hook and eye hasn’t actually changed, since the split to make the downward hike occurs along the back band downward from the strap area, not at the hook and eye. It is imperative for the bottom band and hook and eye seam to be at 90 degrees to one another.
Thank you for the clarification! I was looking at this backwards. I kept reading and re-reading the book and could never figure out how it would work. Now it makes perfect sense.