When Life gives you Grapefruits…
Sometimes I hear breasts called different food related names, such as fried eggs, lemons, grapefruits or melons. You get the idea. We can deal with that. When life gives you grapefruits… or even a set of melons, that’s one thing. But what happens if you are blessed with both a grapefruit and a melon? On the same chest. At the same time.
Option 1 – pad the smaller
Just like when we make a prosthesis (as in this post), you can cut the second and third layers of foam smaller than the first so that the thickness and bulk at the neckline is reduced as much as possible. If you pad up one cup with 3 or 4 layers all the way to the neckline edge, those layers will create a ridge that will be visible under clothes.
Option 2 – Make Each One Unique
Some women forget trying to even them out and make a cup that fits for each side. (Remember what I said about no one will notice…they really won’t! You see it because you are looking at them very close and from above, everyone else sees them from further away and straight on)
Making and fitting each side separately has advantages.
- in the mornings, you just put on the bra and go to work
- no more worries about the padding shifting
- no extra work making the pads
- once you make the pattern, it is regular bra sewing
- no padding to make you sweat!
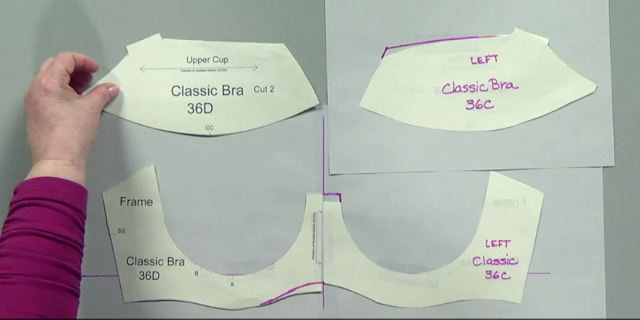
Let’s say you have a 36D on the right side and a 36C on the left side as shown here. Trace the pattern for each cup. Remember to flip the pattern pieces intended for the LEFT side and label them like this.
Next, draw a balance line across a piece of paper and a centre front line at right angles to it. Line the “bowl” of each frame up against the horizontal line and the centre fronts along the CF line.
Notice that the tops of the CF are different as is the bottom of the band. They need to be the same. I almost always raise the shorter centre front to match the longer side. On the band I make the two sides look as similar as I can.
You will also need to raise the upper cup of the 36C a little higher to match with the frame we raised.
To see this and much, much more, see my Craftsy class Sewing Bras: Designer Techniques. The above screenshots were taken from that class.


Extremely good article. Your instructions are always great Beverly
Thanks!
Thank you Carol. Now that I am on a new blogging platform, I am blogging more than ever. I am loving being able to spread the word about sewing intimate apparel!
Merci pour tout vos conseils, cela sera très facile à faire étant donné que quand on a été opéré d un cancer du sein (une ablation total), et ensuite on fait une reconstruction du sein il y a toujours une différence c’est pour ça qu on fait ses sous vêtements soie même merci pour tout j adore votre site
Tu es le bienvenue. Je suis heureux que vous trouverez ces messages utiles !
Beverly, thank you for making all your solutions so simple for us to do. This is just a great fix for uneven “grapefruits”.
I think I get to see more kinds of challenges because I teach so much. I love it when we can help solve a problem that a student has!